Creating Elegant Azure Custom Roles: Putting NotActions into Action!


Creating custom Roles in Azure can be a complex process that may yield long and unwieldy Role definitions that are difficult to manage. However, it doesn’t have to be that way. Read on to learn how you can simplify this process using the Azure “NotActions” and “NotDataActions” attributes, and create custom Azure Roles that are compact, manageable and – dare we say it? – even elegant.
If you’re familiar with the role-based access control (RBAC) mechanism in Azure, then you’ve probably used Roles, which define the actions that an Azure user, group or service principal is allowed to take. Azure offers a set of pre-built Roles – which Azure calls built-in Roles – but you can also build custom ones. However, this may yield lengthy custom Role definitions that are cumbersome and inconvenient to maintain.
In this blog, we’ll explain how Tenable Cloud Security simplifies the process of assigning permissions using custom Roles by streamlining the use of the Azure properties NotActions and NotDataActions. We’ll also outline why making custom Roles easier to read and manage is beneficial for both security and operational purposes.
A look at Azure Roles
The three elements of a Role assignment are: security principal, role definition and scope. (If you’d like a refresher on the basics of Azure Roles, please check out our blog post “Deconstructing Azure Access Management using RBAC.”)
For the purposes of this blog post, it’s essential to note that an Azure Role is a JavaScript Object Notation (JSON) document detailing the list of permissions to be granted to an identity as part of a Role assignment. A role assignment in turn assigns these permissions for a given resource or set of Azure resources to an identity.
What is “NotActions”?
The “Actions” field in a Role lists the control plane actions – such as creating, managing and deleting resources – that the Role will grant an identity, such as a user or a group, as part of a Role assignment.
Similarly, the “DataActions” field lists the data plane actions that the Role will be able to perform, such as reading and writing data within resources.
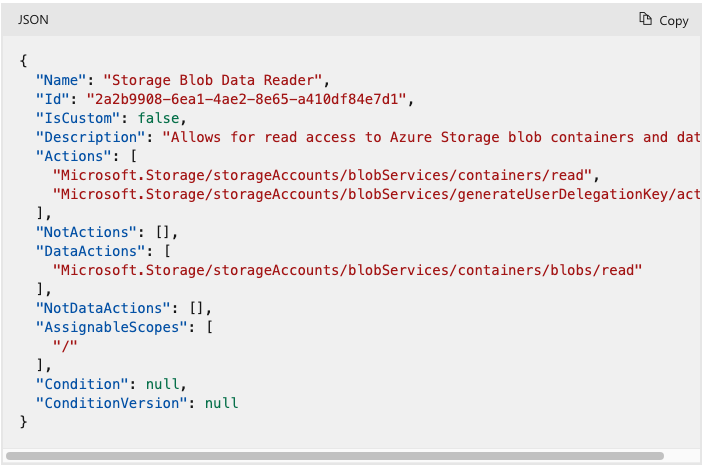
Figure 1: An example of a Role in Azure, with “Actions” and “DataActions”. Source: Azure Documentation
“NotActions” allows you to subtract actions from the control plane actions listed in the “Actions” field that will thus not be granted by the Role. So if you create a custom Azure Role by tailoring a built-in Azure Role, you can remove permissions from the built-in Role’s control plane “Actions” field via the “NotActions” attribute.
Similarly the “NotDataActions” attribute removes permissions from the built-in Role’s data plane listed in “DataActions”.
Another mechanism you should become familiar with due to its convenience are wildcards. You can use wildcards (*) to define sets of “Actions,” “NotActions,” “DataActions,” and “NotDataActions” permissions, instead of having to list those permissions individually.
“With a wildcard (*), you extend a permission to everything that matches the action string you provide,” reads a Microsoft documentation page.
Here’s an example Microsoft offers. If you want to add all the permissions related to Azure Cost Management and exports, you could add these five action strings individually:
Microsoft.CostManagement/exports/action
Microsoft.CostManagement/exports/read
Microsoft.CostManagement/exports/write
Microsoft.CostManagement/exports/delete
Microsoft.CostManagement/exports/run/action
Or alternatively you could add this wildcard string, which is equivalent to the five individual strings.
Microsoft.CostManagement/exports/*
So, if we want to create a Role that will allow all actions on Azure Cost Management Exports except the ability to delete them, we can put “NotActions” and wildcars together and place the following pattern in “Actions”:
Microsoft.CostManagement/exports/*
And in “NotActions” we would then specify:
Microsoft.CostManagement/exports/delete
This will allow the defined Role to read, write and run exports, but not to delete them. Instead of having to specify the four actions which are available (/read, /write, /action and /run/action), we only had to specify the pattern in “Actions” and the one excluded action in “NotActions”.
This may seem like a marginal improvement when creating Azure custom Roles, but it could be very meaningful when reaching a certain scale.
How meaningful? We’ll soon see. But first let’s make one important note about these fields.
What “NotActions” isn’t
For anyone who has experience with “allow / deny” rules, it could be very tempting (and somewhat intuitive) to think of “NotActions” and “NotDataActions” as deny assignments. But they aren’t.
The difference is quite significant.
A deny assignment would mean that an action specified in one of these fields would always be denied to an identity to which the policy would be assigned. In other words, even if this action is granted to this identity in a different assignment, the identity wouldn’t be able to perform it.
Had this been true for “NotActions”, it would have been extremely helpful for creating security boundaries around resources. But this is in fact not the case.
A permission that’s excluded via either “NotActions” or “NotDataActions” in one Role can be granted to the same user in a different Role.
Make sure you remember that.
Let’s see NotActions in Action
The Tenable Cloud Security product provides cutting edge analysis of cloud permissions, in this case strengthening Azure security.
As part of Tenable Cloud Security’s CIEM (Cloud Infrastructure Entitlements Management) functionality, we automatically analyze all the permissions assigned to all identities in Azure subscriptions and compare them with actual activity as detected in logs. This allows us to automatically generate suggestions for replacing currently assigned Roles with least-privileged custom Roles that only have the permissions that are needed by the identity for its business functionality. That way, in case an identity is breached, the fallout will be less severe than if the identity had had broader, unnecessary privileges.
This can be done on-demand for Roles you have running (as can be seen in figure 2). For example, you can create a step as part of your testing protocol to have services running in a testing environment with a relatively “loose” set of permissions – which are easy to define. Then you could replace them in staging and production with the appropriate least-privileged Roles created on-demand based on the observed activity of the service during the testing period.
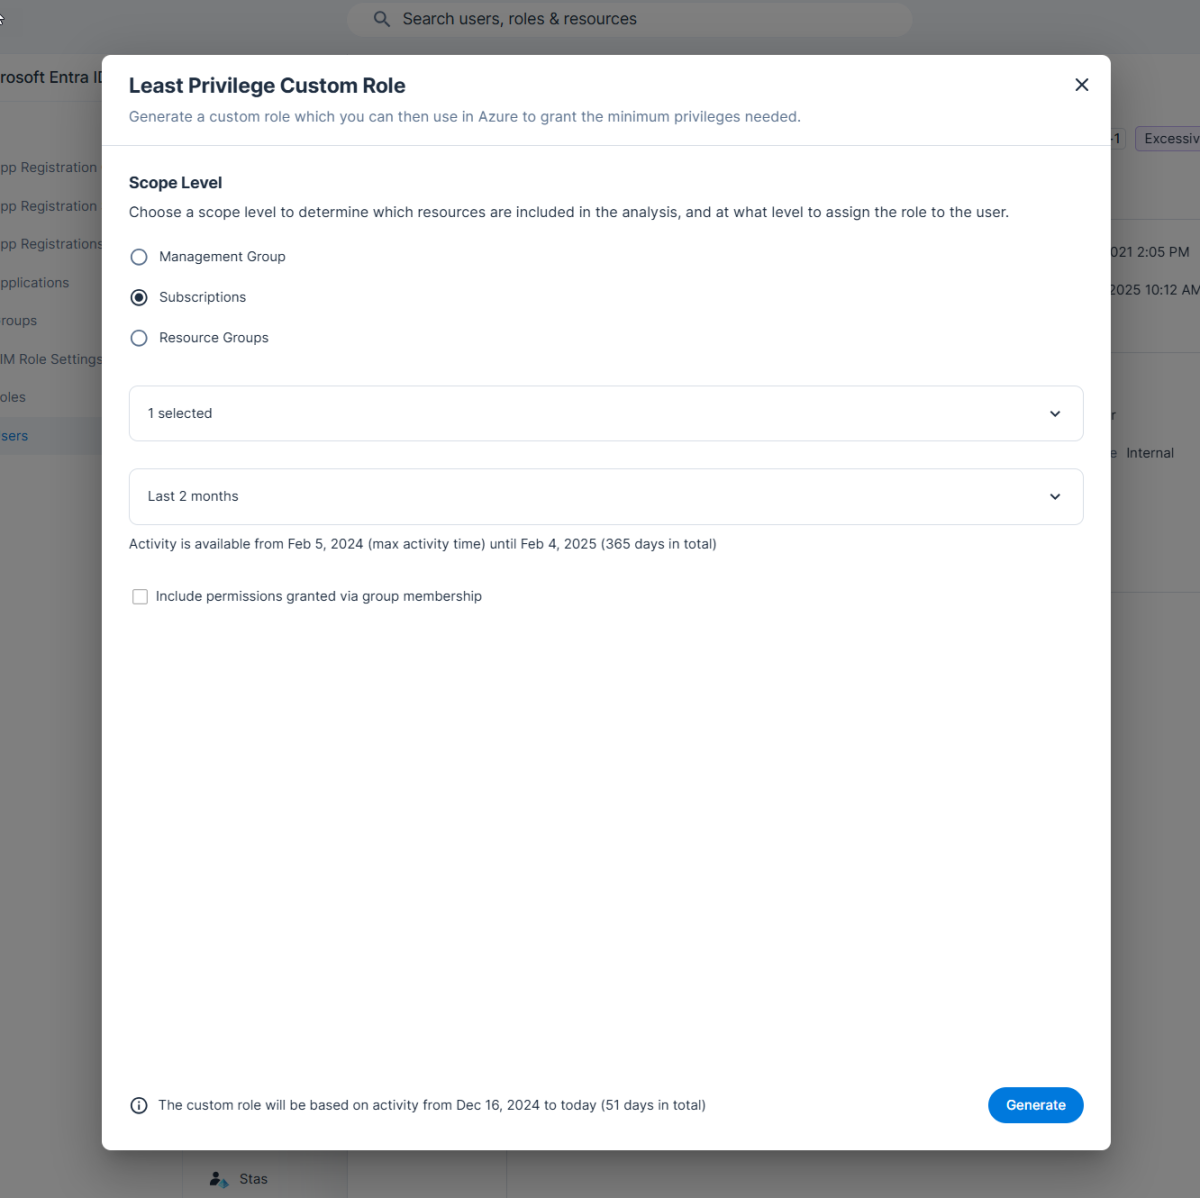
Figure 2: Generate least-privileged roles on demand for a specific scope and time frame
Tenable Cloud Security can also automatically find overprivileged identities and flag them as a security issue. Tenable Cloud Security will then provide the automatically generated least-privilege custom Roles a dedicated “Remediation” tab for solving the issue, as can be seen in figure 3:
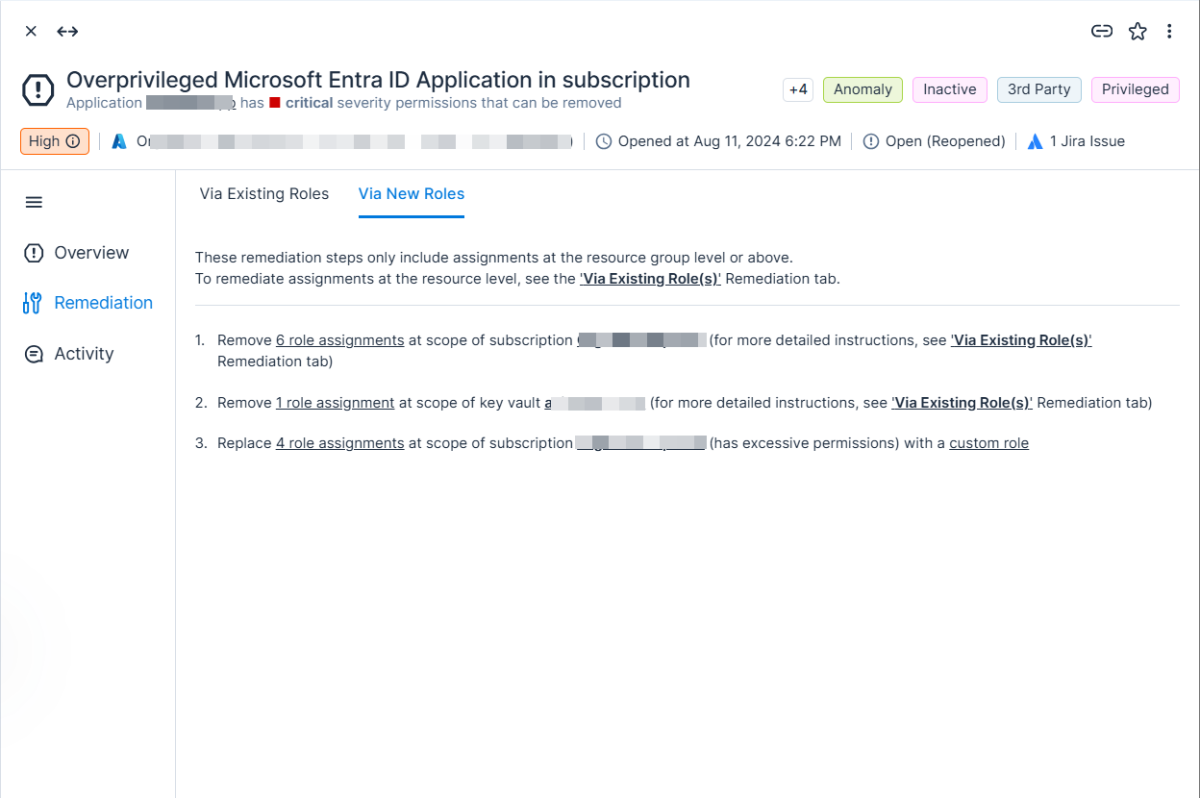
Figure 3: An overprivileged application finding with the remediation suggestion to resolve it
Our automatically generated custom Roles take the “NotActions” field into account, so if it was included in the original role assigned to the identity, we factor it in and include it in the least privileged roles as well.
In order to show just how meaningful this could be, we created a “before” and “after” view showing the use of the “NotActions” field for one of the identities we analyzed. This identity had “NotActions” included in the overpermissive Role originally assigned to it.
This is what we generated as a least-privileged role, without using “NotActions”:
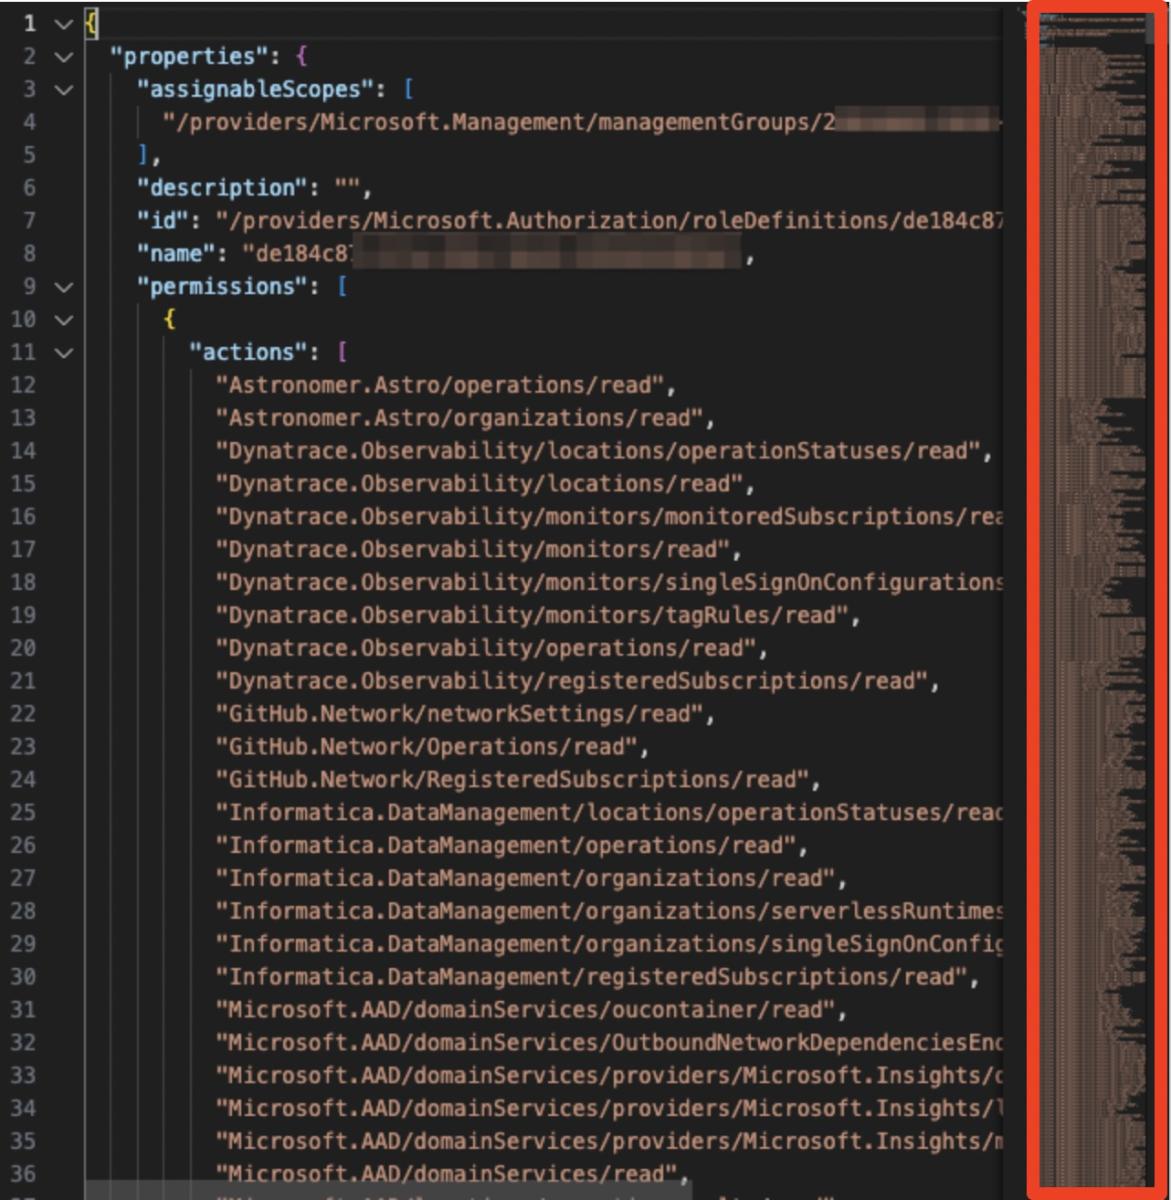
Figure 4 - Custom Role suggestion generated for an identity without using “NotActions”
Figure 4 shows the top of the document in Visual Studio Code, which is just a tiny fraction of the full document.
The “Actions” field of the JSON document has over 7200 (!) lines as shown in Figure 5:
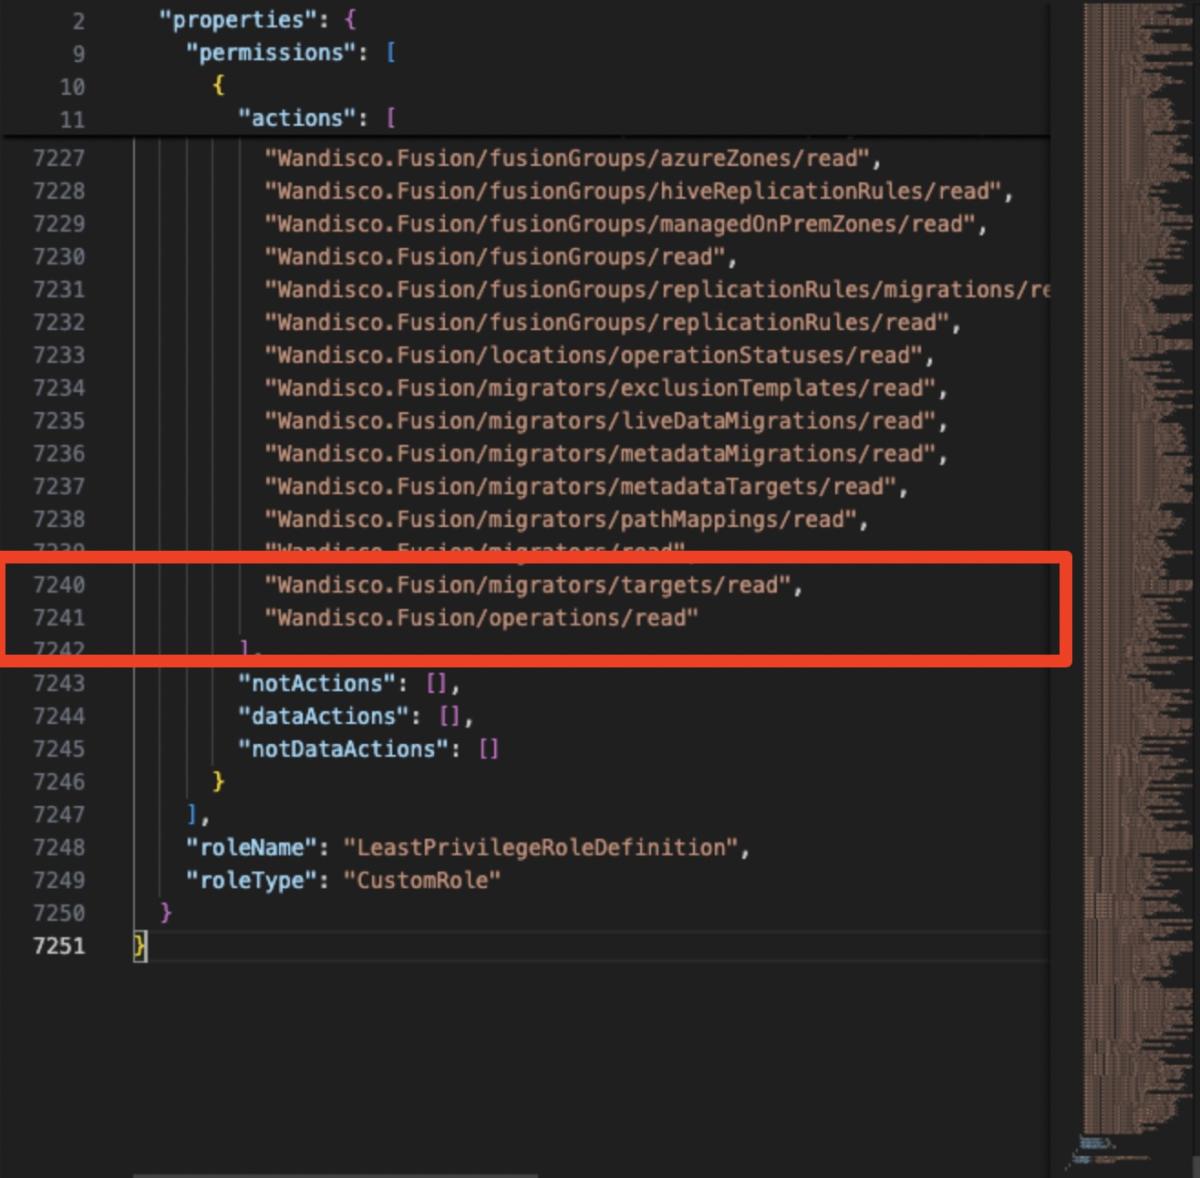
Figure 5 - Custom role suggestion shown in figure 2 scrolled to the bottom
Imagine having to go over this gargantuan document to understand exactly what it means or to debug it.
However, when Tenable Cloud Security creates least-privileged custom Roles factoring in the existing “NotActions” field, we can do this in a much more compact and elegant way – so much so that we will be able to fit the entire JSON document into a single screenshot.
The result of the advanced logic of Tenable Cloud Security calculating how to structure custom roles will look something like this:
There will be a custom Role (or Roles) with actions and action patterns (with the “*” character as wildcard) that will not have “NotAction” specified in them where it’s not needed, and will look like this:
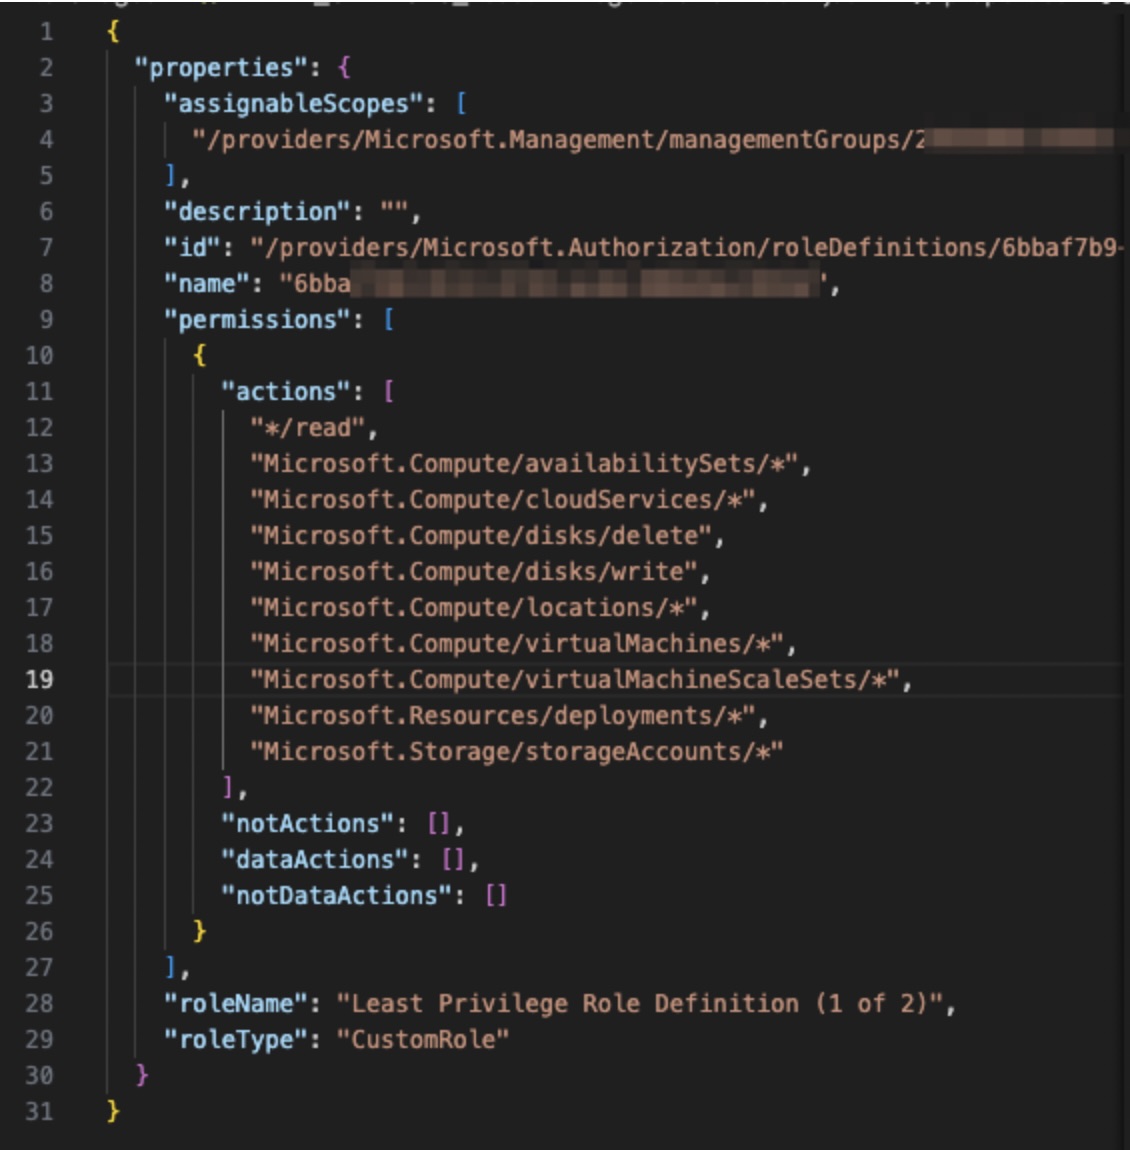
Figure 6 - First part of the least-privilege custom Role suggestion for action patterns that need to be included completely
And for recreating the existing appearances of the “NotActions” field, there will be a Role (or Roles) that includes them as necessary:
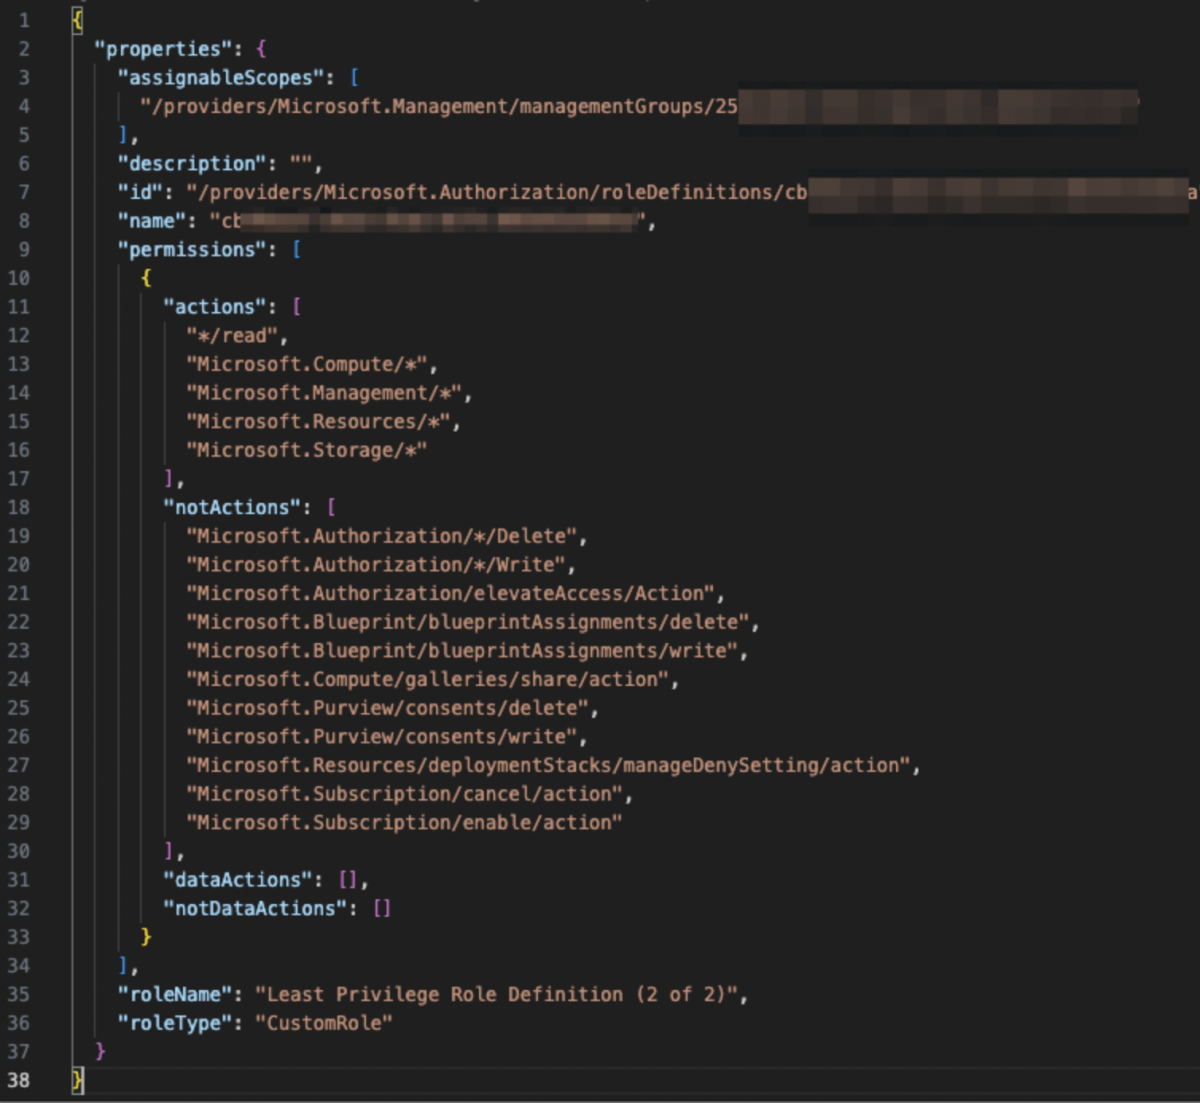
Figure 7 - Second part of the least privilege custom role suggestion, including necessary actions in the “NotActions” field
Believe it or not, but these two custom Roles with fewer than 70 lines total between them are equivalent to the Role we saw in figures 4 and 5 with over 100 times (!) the line count for just the “actions” field.
Wow!
You can now assign these two readable and elegant custom Roles to the identity and manage them much more easily. They’ll also be a lot easier to debug and you’ll be able to apply them with confidence. (Of course, you should conduct extensive testing before moving these identities to a production environment.) In the end, this can make the difference between applying the least-privileged Roles and keeping the old, over-permissive risky ones.
That’s how powerful it can be to use “NotActions” properly.
Conclusion
Just like Tenable Cloud Security does, you can use the “NotActions” field to write elegant and understandable Azure custom Roles – just make sure you understand exactly what permissions to include and exclude, and always test in a lower environment before moving to production.
We’ll be happy to set up a demo of Tenable Cloud Security for you so that you can test the Roles in Azure and in other cloud environments; ensure they’re not overprivileged; and, if they are, replace them with a suggested custom Role.
Learn more


Tenable One
Request a demo
The world’s leading AI-powered exposure management platform.
Thank You
Thank you for your interest in Tenable One.
A representative will be in touch soon.
Form ID: 7469
Form Name: one-eval
Form Class: c-form form-panel__global-form c-form--mkto js-mkto-no-css js-form-hanging-label c-form--hide-comments
Form Wrapper ID: one-eval-form-wrapper
Confirmation Class: one-eval-confirmform-modal
Simulate Success