PVS App for Splunk
Note: Passive Vulnerability Scanner (PVS) is now Nessus Network Monitor. To learn more about this application and its latest capabilities, visit the Nessus Network Monitor web page.
Thanks to Jason Toy for contributing to this post
Splunk Enterprise analyzes everything from customer clickstreams and transactions to network activity and call records, turning your machine data into valuable insights. The Tenable™ PVS app for Splunk increases the security threat intelligence of Splunk by sending it critical security-relevant information.
Why PVS
Adding PVS data to Splunk brings PVS, the only patented passive vulnerability scanner with deep packet inspection, to Splunk's platform. This streamlines tracking users, applications, cloud infrastructure, trust relationships, and vulnerabilities on all assets active on the network. PVS scans all networks safely; including SCADA and ICS, and it itemizes applications and vulnerabilities on mobile devices. PVS does all of this continuously, automatically, and in real-time.
The Tenable PVS app for Splunk finds the security-relevant information from tens of terabytes of traffic per day and feeds it to Splunk for comprehensive analysis.
From the time of installation, PVS performs automatic discovery of all devices, infrastructure, users, and vulnerabilities across more technologies than any other vendor. This includes OS, network devices, virtual systems, cloud-based systems, hypervisors, databases, tablets, phones, web servers, and critical infrastructure.
Experiencing the Benefits
By enhancing Splunk with PVS, network and asset awareness is dramatically improved. In Splunk, installing the PVS app creates a new eventtype called “pvs”, which are real-time events that will be recognized and parsed. The search fields included are source IP (src), source port (src_port), destination IP (dest), destination port (dest_port), protocol (protocol), plugin ID (PVS_pluginid), event name (PVS_eventname), and plugin specific data (PVS_data). Splunk searches can be applied to any of these fields.
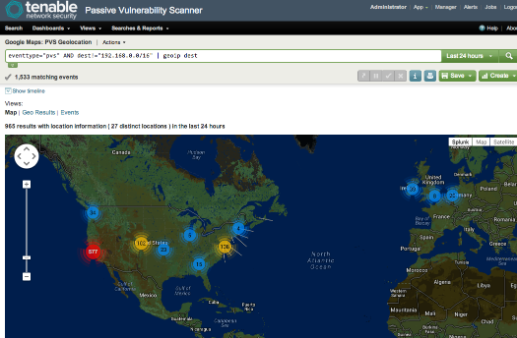
In the PVS app for Splunk, Splunk can chart PVS events shown in the screenshot below:

With Google Maps for Splunk installed, you can quickly generate geographical information from the PVS real-time events. The image shows destination IPs over the past 24 hours.

How to Use
Splunk 6.x and PVS 4.0.x must be installed to use the PVS app for Splunk.
The free eval of PVS provides PVS for 30 days to try with this Splunk app before purchasing.
Here’s how easy it is to get started with the PVS app after both Splunk and PVS are installed:
- Log into PVS and navigate to PVS Settings/Configuration, and configure to send real-time syslog information to Splunk
- Download the Tenable Network Security PVS App for Splunk here by visiting: http://apps.splunk.com/app/1844/
- Log into Splunk and select ‘Manage Apps’ from the App menu
- Click ‘Install app’ button
- Click ‘upload file’ button, browse to locate the downloaded tenable-network-security-pvs-app-for-splunk_102.tgz file. Click ‘Open’ and ‘Upload’
- Click ‘Restart Splunk’ and confirm the restart
- After Splunk has restarted, login to Splunk. The PVS application will be ready to use.
- Event Monitoring
- Nessus Network Monitor
- Passive Network Monitoring

